
Are you considering rewiring your house? It can be a daunting task, but it doesn’t have to be. In this article, we will answer some of the most common questions about rewiring and provide helpful tips to make the process easier for you. We’ll discuss everything from what materials you’ll need to how to prepare for the project. So whether you’re a first-time homeowner or experienced DIYer, read on for all the information you need to know about rewiring your house!
When Does a Property Need Rewiring?
As homes age, the wiring system can become outdated or damaged. If your home was built before 1950, it likely needs to be rewired. Homes that were built between 1950 and 1965 may also need to be rewired, depending on the type of wiring that was originally installed.
If you’re not sure whether your home needs to be rewired, there are a few signs you can look for:
- Your outlets are hot to the touch
- Your circuit breaker trips frequently
- Your outlets spark when you plug something in
- You have flickering lights
- You have a burning smell coming from your outlets
If you notice any of these signs, it’s time to call in a professional electrician to inspect your wiring.[4]
What does rewiring a house involve?
Rewiring a house involves running new electrical wiring throughout the home to replace old, outdated, or damaged wiring. This can be a daunting task, but with careful planning and execution it can be done relatively easily.[5]
How to Tell if Your Property has Been Rewired
If you live in an old home, it’s likely that the wiring has not been updated in many years. If your home is more than 40 years old, it’s possible that the wiring is original to the house. While this isn’t necessarily a bad thing, it’s important to know the condition of your wiring and whether or not it needs to be updated. Here are a few signs that your home may need to be rewired:
- Your outlets are hot to the touch
- There is flickering or dimming of lights when appliances are turned on
- Outlets spark or make crackling noises
- Fuses blow frequently
- You have two-pronged outlets[5]
What if it has not Been Rewired?
If you live in an old home, it is quite possible that the wiring has not been updated in many years. While this may not be a problem most of the time, it can pose a serious safety hazard if not properly maintained. If you are unsure whether or not your home’s wiring is up to date, it is best to contact a professional electrician to come and take a look. They will be able to tell you if your wiring needs to be replaced or if it can simply be repaired.
In some cases, homes that have not been rewired will still use knob and tube wiring. This type of wiring was common in homes built before 1950 but is now considered outdated and dangerous. If your home has this type of wiring, it is important to have it replaced as soon as possible. While it may seem like a daunting task, rewiring your home is actually not as difficult or expensive as you might think. With a little bit of planning and some help from a professional, you can have your home’s wiring updated in no time.
If you are planning on selling your home, one of the first things that potential buyers will look at is the condition of the wiring. If your home has outdated or dangerous wiring, it will likely deter buyers from making an offer. In some cases, you may even be required to have the wiring updated before listing your home on the market.[4]
How Disruptive is Rewiring a House?
The first question many homeowners ask is “How Disruptive is Rewiring a House?” The answer to this question can vary depending on the age of your home, the type of wiring that needs to be replaced, and how much work needs to be done. In most cases, however, rewiring a house is not as disruptive as you might think.
In most cases, rewiring a house is not a very disruptive project. Electricians will need to access your crawl space or attic in order to run new wires, but this is usually a quick and easy process. Once the electricians have access to your home, they will be able to quickly and easily replace your old wiring with new wiring. In most cases, you will not even need to be home while the electricians are working.[4]
How Much Does Rewiring a House Cost?
The cost of rewiring a house will depend on the size and age of the property, as well as the amount of work required. Expect to pay between $800 and $3000 for a small home, and up to $10000 for a large or older property.
If you are planning on doing any major renovations, it may be worth getting your home rewired at the same time. This will ensure that all of your electrical work is up to code and can save you money in the long run.[4]
How Long Does Rewiring a House Take?
The time it takes to rewire a house can vary greatly depending on the size of the home, the age of the wiring, and the number of circuits that need to be installed. In most cases, however, a complete rewiring job will take several days to complete.
During the initial planning stages, your electrician will need to evaluate your home’s current electrical system and make any necessary changes to accommodate your new wiring. This process usually takes a few hours. Once everything has been planned out, your electrician will begin running new wires through your walls.
Depending on how much work needs to be done, this part of the job can take anywhere from a few hours to a couple of days. Once all of the new wiring has been installed, your electrician will then need to connect it all to your home’s main electrical panel.
This final step is typically the quickest, and once it’s completed your new electrical system will be up and running! In most cases, a complete rewiring job will take between four and five days from start to finish.[4]

At What Stage Does Rewiring a House Take Place?
Rewiring a house generally takes place during its construction. The electrician will need access to the frame of the house, so it’s important to have this work done before the walls are closed up. However, if you’re renovating an older home, you may need to do some rewiring as part of your project. This is usually not a very difficult or expensive task, but it’s important to get it done correctly to ensure the safety of your home and family.[4]
Checking Earth Bonding
If you’re thinking about rewiring your home, it’s important to first check the earth bonding and electrical safety. This can help prevent any accidents or damage to your property.
There are a few things you need to check before starting any work:
- The main switchboard should be easily accessible and labeled.
- All sockets and light fittings should have an earth connection.
- Any exposed metal work should be earthed.
- wiring should be supported and not hanging loose.
If you’re not sure about anything, it’s always best to call a qualified electrician for advice. They’ll be able to carry out any necessary tests and give you peace of mind that your home is safe.
Once you’ve checked the earth bonding, you’re ready to start planning your rewiring project.[4]
Electrics in Wet Areas
Water and electricity don’t mix, so any electrical work in areas where there’s a risk of water damage needs to be carried out with extra care. You’ll need to take special precautions when working in kitchens, bathrooms and other wet areas.
Plan & Prepare Stage
Now that you know what’s involved in rewiring your home, it’s time to start planning and preparing for the project. Here are a few tips to help you get started:
- Start by creating a budget for the project. This will help you determine how much money you’ll need to complete the job.
- Next, create a list of all the materials you’ll need. This includes things like wire, outlet boxes, and light fixtures.
- Once you have all of your materials, it’s time to start planning the actual process of rewiring your home. Begin by drawing a diagram of your home’s electrical system. This will help you visualize where everything needs to go.
- Finally, make sure you have all the necessary permits and approvals before beginning any work. This includes things like building permits and electrical inspections.[1]

Set a Budget
The first step is to set a budget for the project. This will help determine how much work needs to be done and what can be done DIY. A professional electrician will be able to give you a more accurate estimate, but it’s still good to have an idea of how much the project will cost.
Once you have a budget, you can start planning the project. This includes figuring out what needs to be done, getting the necessary supplies, and scheduling the work. If you’re doing the work yourself, it’s important to make sure that you have all of the necessary tools and supplies before starting. Otherwise, you’ll end up making multiple trips to the hardware store![2]
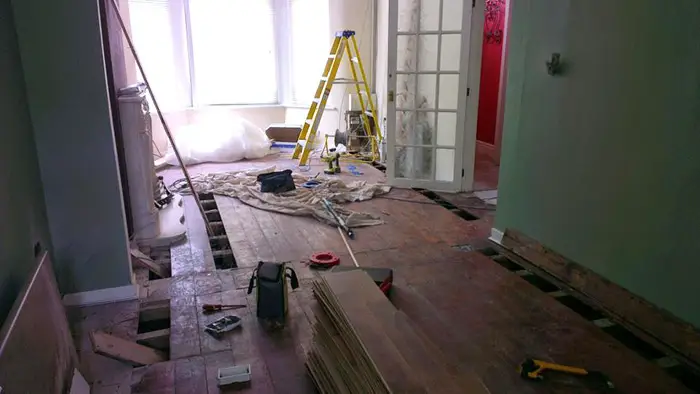
Prep Work Stage
Now that you know what tools and materials you’ll need for the job, it’s time to start prepping your home for its new wiring.
This stage is critical to ensuring a smooth and successful rewiring process, so be sure to take your time and follow these steps carefully.
First, you’ll need to turn off all the power to your home. This includes power from the street, as well as any backup generators or solar panels you may have. Next, remove all wall coverings, flooring, and ceilings so that you have full access to the existing wiring. Once everything is removed, use a circuit tester to verify that there is no power running through the wires.[3]
With the prep work complete, you’re now ready to start rewiring your home!
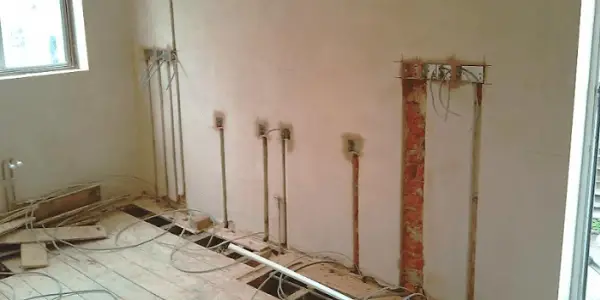
Removal Stage
The first step is to obviously remove the old, faulty wiring. This can be done by gently pulling it out of the walls and ceilings, being careful not to damage the plaster or other materials surrounding it. You will also want to make sure that you have all of the proper tools for the job before beginning, such as a screwdriver, wire strippers, and pliers.
Once the old wiring is out, you can start running the new wiring through the walls and ceilings. Again, be careful not to damage any of the surrounding materials. It is always a good idea to tape the new wires down so they don’t move around while you are working.[3]
New Wiring Stage
The first step is to shut off the power to your home at the breaker box. Once the power is off, you can begin removing all of the old wiring from your home. This includes outlets, switches, and any other electrical fixtures. Be sure to label each wire as you remove it so you’ll know where it goes when it’s time to rewire.

After all of the old wiring has been removed, you can start installing new wiring. The best way to do this is to run wires through the studs in your walls. This will give you a solid foundation for your new electrical system. To wire through the studs, simply drill a hole large enough for the wire to fit through and then feed the wire through the hole.
Once all of the new wiring is in place, you can begin installing new outlets, switches, and other electrical fixtures. Be sure to connect the wires to the correct terminals on each fixture. Once everything is connected, you can turn the power back on at the breaker box and test your new electrical system.[3]
Some Additional Tips
- Before you begin your project, it is important to understand the different types of wiring that are available.
- There are three main types of electrical wiring: service entrance, feeder and branch.
Service entrance wire is the main power supply that enters the home from the utility company.
Feeder wires distribute power from the service panel to subpanels throughout the house.
Branch wires run from outlets and switches to provide electricity to specific areas of the home.
- If you are not comfortable working with electricity, it is best to hire a professional electrician to do the job for you.
- Be sure to get multiple estimates and ask for references before making a final decision.
- Rewiring a house is a big job, but it is important to make sure it is done properly in order to avoid any safety hazards.[3]
Tips For Rewiring A House Without Removing The Drywall
If you’re planning on rewiring your home, there are a few things you should keep in mind. One is that you don’t necessarily have to remove the drywall in order to do so. Here are some tips on how to rewire your house without removing the drywall:
- Work with an electrician: This is probably the most important tip. Even if you think you know what you’re doing, it’s always best to work with a professional. They’ll be able to help you plan out the wiring and make sure everything is done correctly.
- Label everything: Once you start working, be sure to label everything clearly. That way, if something goes wrong or you need to make changes later on, you’ll know exactly where everything is.
- Test as you go: As you’re working, be sure to test the wiring as you go. That way, you can catch any mistakes early on and avoid any potential problems down the line.[1]
Do it Yourself or Hire a Pro?
The first step is to determine whether you will do the work yourself or hire a professional. If you are not comfortable working with electricity, it is probably best to hire a pro. Otherwise, follow these steps:
- Turn off the power to the house at the main breaker box.
- Remove all of the old wiring from the walls. This may involve removing some wallboard.
- Run new wires through the walls following your blueprint.
- Connect the new wires to outlets, switches, and fixtures.
- Install any new outlets, switches, and fixtures.
- Turn on the power at the main breaker box and test everything.[2]
Be Prepared for Disruption
Disruptions are inevitable when you’re undertaking a project as big as rewiring your house. You can minimize the inconvenience by preparing for it in advance. Talk to your family or housemates about the project and make sure everyone is on board with the disruption.
Plan ahead for where everyone will sleep, cook, and do their daily activities while the work is being done. And most importantly, give yourself some extra time to complete the project. Rushing to finish will only increase the chances of making mistakes.[2]
Signs your home may need rewiring
If you’re unsure whether your home needs rewiring, there are a few key signs to look out for:
- Your home has never been wired before
- Your home is over 40 years old
- You have knob and tube wiring
- You have aluminum wiring
- Your outlets or switches are hot to the touch
- Your breakers trip frequently
- Your lights flicker or dim when appliances are in use [5]
Benefits of rewiring your home
Some of the benefits of rewiring your home include:
-
Improved safety: One of the most important reasons to consider rewiring your home is for safety purposes. Outdated electrical systems can pose serious risks, including fire hazards. By updating your home’s wiring, you can help protect yourself and your family from potential dangers.

Increased energy efficiency: Another benefit of rewiring your home is that it can help increase your energy efficiency. Newer wiring systems are designed to be more efficient than older ones, which can help you save money on your energy bills.
Improved resale value: If you’re thinking about selling your home in the future, rewiring can also help improve its resale value. Many buyers are willing to pay more for a home that has been updated with new wiring.
Rewiring your home can have many benefits, but it’s important to make sure that it’s done correctly. Hire a professional electrician to handle the job if you’re not comfortable doing it yourself. They’ll be able to ensure that everything is done safely and up to code.[5]
Comparison of Methods for Rewiring a House
Rewiring a house is a significant undertaking, and different methods can be employed for this task. Below is a comparison of various rewiring methods, helping you determine the most suitable approach for your house rewiring project.
| Rewiring Method | Scope of Work | Materials Needed | Professional Involvement | Time Required | Cost | Considerations |
|---|---|---|---|---|---|---|
| Partial Rewiring | Rewiring specific areas or circuits of the house, such as a single room or the kitchen. | New wiring, electrical boxes, outlets, switches, conduit, and fixtures as needed. | Moderate professional involvement, particularly for electrical work and permits. | Varies based on the scope but relatively quicker compared to a full rewiring project. | Costs are lower than a full rewire but depend on the extent of the work and materials used. | Suitable for addressing specific electrical issues or upgrades in a cost-effective manner. |
| Full Rewiring | Rewiring the entire house, replacing all electrical wiring, outlets, switches, and fixtures. | New wiring, electrical panels, outlets, switches, conduit, fixtures, and extensive labor. | Extensive professional involvement, including electrical contractors and inspections. | Significantly longer, often taking several weeks or more to complete. | Higher overall cost due to the comprehensive scope and labor involved. | Necessary for older homes with outdated or unsafe wiring systems or major renovations. |
| DIY Rewiring | Performing the rewiring work independently or with the help of friends or family. | Same materials as partial or full rewiring, plus tools and safety equipment. | Variable professional involvement, depending on local regulations and personal expertise. | Potentially longer, as it may take more time for non-professionals to complete the work. | Potentially lower costs in terms of labor but risks mistakes and safety hazards if not done correctly. | Suitable for experienced individuals with electrical knowledge or small-scale projects. |
Explanation of the table:
- The table provides a comparison of different methods for rewiring a house, including the scope of work, materials needed, professional involvement, time required, cost, and considerations for each method.
- Each rewiring method is described, highlighting its unique characteristics and suitability for different house rewiring scenarios.
FAQ
Does rewiring a house make a mess?
The short answer is yes, rewiring a house can make quite a mess. However, the good news is that your electrician will know how to minimize the mess and will clean up after themselves once the job is done.
One thing you can do to prepare for the mess is to remove any breakable items from the area where the work will be taking place. This includes things like vases, knick-knacks, and picture frames. It’s also a good idea to clear out any furniture that might be in the way so that your electrician has plenty of space to work.
Does rewiring a house add value?
If you’re planning to sell your home, rewiring it can most certainly add value. A house that has been updated with new wiring will be much more appealing to potential buyers than one that hasn’t, and could lead to a faster sale and a higher selling price. Even if you’re not planning on selling any time soon, rewiring your home can still add value in the form of increased safety and peace of mind.
What are the indications that a house may need rewiring, and how do you assess the extent of the work required?
Indications that a house may need rewiring include flickering lights, frequent electrical issues, outdated wiring, or safety concerns. To assess the extent of the work required, it’s advisable to consult a licensed electrician who can perform a thorough inspection and provide recommendations.
What are the general steps involved in rewiring a house, and is it a DIY project?
Rewiring a house involves several steps, including turning off the power, removing old wiring, installing new wiring, and updating outlets and switches. It is not recommended as a DIY project due to the complexity and safety hazards involved. Professional electricians should handle rewiring to ensure compliance with local codes and safety standards.
How long does it typically take to rewire a house, and what factors can affect the timeline?
The time required to rewire a house can vary depending on factors such as the size of the house, the extent of rewiring needed, and any unforeseen issues encountered during the process. A typical rewiring project can take several weeks to complete, but the electrician should provide a more accurate estimate.
What are the potential costs associated with rewiring a house, and how can homeowners budget for this project?
The cost of rewiring a house depends on factors like the size of the house, the complexity of the project, and the local labor rates. Homeowners can budget for the project by obtaining quotes from licensed electricians and considering any necessary electrical upgrades or permits.
Are there any specific safety precautions homeowners should take during a house rewiring project?
Safety precautions during a house rewiring project are crucial. Homeowners should ensure the power is turned off, stay clear of electrical work areas, and follow any safety instructions provided by the electrician. It’s also essential to have smoke detectors and fire extinguishers on hand in case of emergencies.
Useful Video: House Rewire – Day One – Electrician Life
Conclusion
By following these steps, you can rewire your house on your own. However, we understand that not everyone is comfortable handling electrical wiring. If you don’t feel confident or safe doing it yourself, please don’t hesitate to call a professional electrician. They will be able to help you rewire your house quickly and safely.
We hope this guide has been helpful in teaching you how to rewire a house. If you have any questions or comments, please leave them below! Thank you for reading!
References
- https://pennaelectric.com/how-to-rewire-a-house-without-removing-drywall-4-stages-tips/
- https://www.homereference.net/rewiring-a-house/
- https://www.electronicshub.org/how-to-rewire-a-house/
- https://www.homebuilding.co.uk/advice/rewiring-explained
- https://www.ratedpeople.com/blog/rewiring-a-house