Standard shower valve height is an important aspect to consider when planning a bathroom renovation or remodeling project. Properly installed and maintained, these valves can provide years of reliable service. However, choosing the wrong height for your shower valve could lead to uncomfortable showers and potential safety hazards. By taking into account the necessary factors such as user stature, water pressure, and local building codes you can ensure that your shower valve will be safely installed at the optimal height for years of comfortable use.
What Is A Shower Valve?
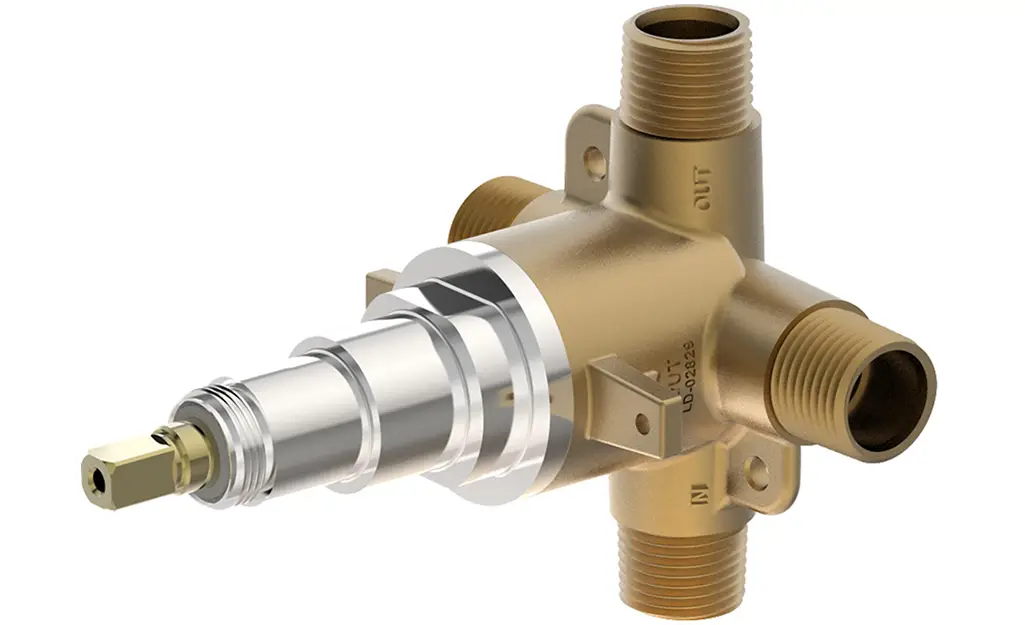
A shower valve is a mechanical device that controls the flow and temperature of hot and cold water into a shower or tub. It’s usually composed of two knobs or levers that control the water pressure, one for hot and one for cold, as well as an optional diverter which allows you to redirect the flow of water between different outlets.
Thermostatic Shower Valve
Adjust the temperature of your shower water to precise levels and maintain it using a thermostatic shower valve – a must-have fixture for any bathroom. It usually contains two different valves – one for cold water and one for hot water, which are used in combination to achieve the desired level of comfort. To guarantee the utmost security, thermostatic shower valves should be installed at a height suitable for individuals of any size.
Manual Shower Valve
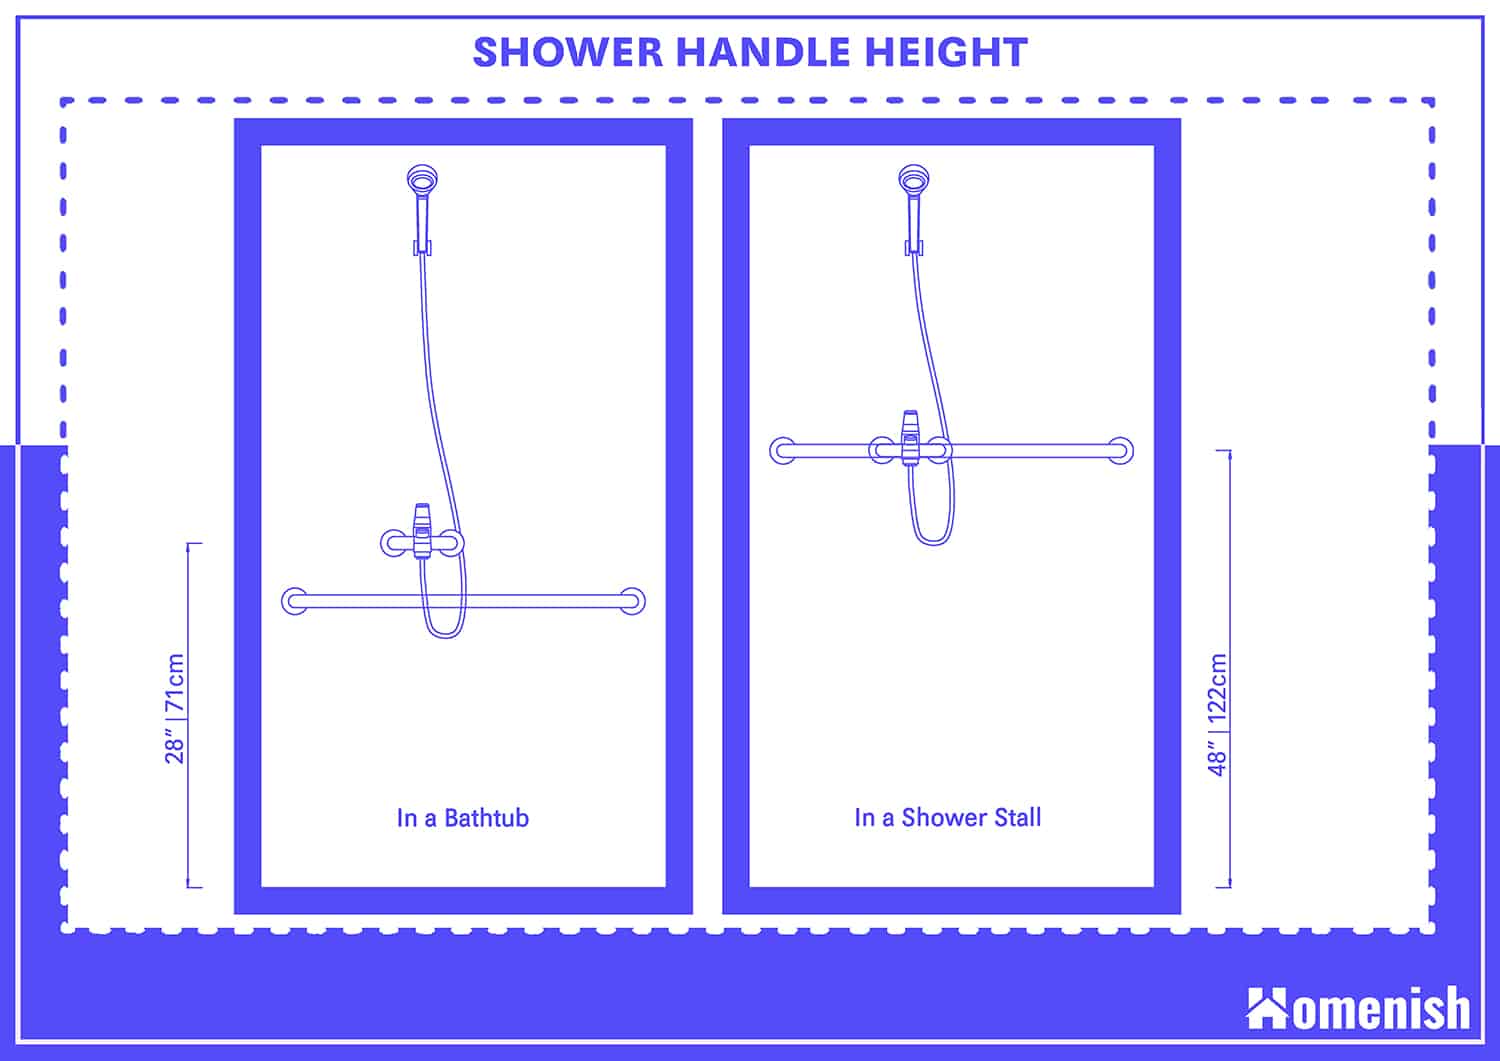
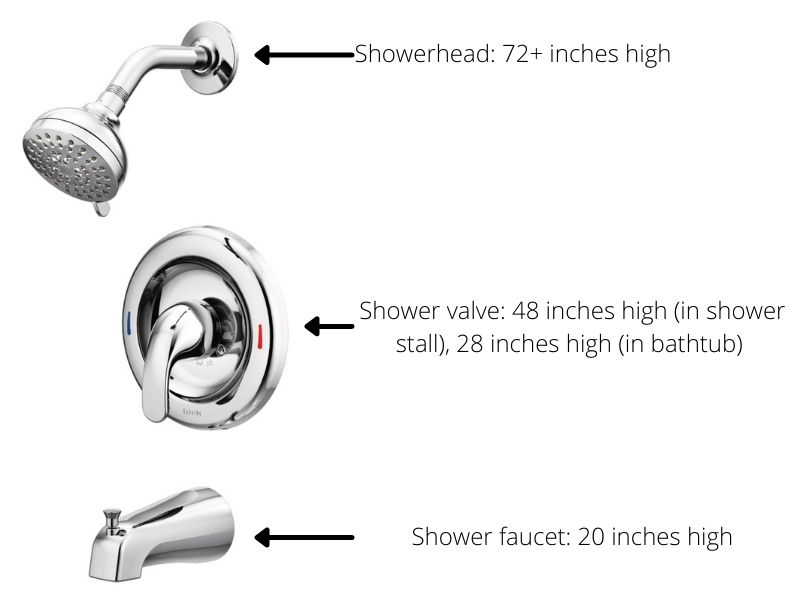
For an optimal shower experience, manual valves should be installed at least 48 inches from the floor. This is to ensure that it is within reach while standing and comfortable to use. Manual shower valves are typically designed with two handles, one for hot water and one for cold water, which when turned together will control the temperature of the water coming out of the showerhead.
Digital Shower Valve
Digital shower valves have become increasingly popular in recent years, providing more accurate temperature control and safety features than traditional hardware-based systems. In the same way as standard valve height, digital showers will vary in installation details depending on the brand or model of the system. Generally, for a comfortable user experience, it is recommended that digital shower valve height is installed at a minimum of 48 inches from the floor.
This height can be adjusted depending on individual user preferences or to accommodate for taller individuals in the household. Prior to installing your digital shower valve, it is imperative that you consult the manufacturer’s guidelines – as some systems may necessitate a different installation height than others. To guarantee the best possible experience with your digital shower valve, make sure it is installed at its proper height.
What Is The Standard Shower Valve Height?
Set the customary shower valve height approximately 42 inches from your flooring for optimal comfort. This is a rough guide, and can vary between manufacturers. Height recommendations are based on average user heights and comfort levels when using the valves and shower heads.
When installing a new shower valve, it is important to check the manufacturer’s instructions for their recommended height. This is to ensure that the valve and shower head are positioned at an appropriate distance from the floor for safety, comfort, and optimal performance.
It is also important to consider the usability of a shower when choosing valve height. The exact height will depend on user preference, but should provide easy access without having to reach too high or too low. For safety reasons, it is not recommended to have the valve positioned more than 42 inches from the floor.
Finally, if you are installing a shower valve with two handles (hot and cold), there may be guidelines for proper spacing between them. It is important to follow these instructions to avoid temperature control issues in the shower.
Factors That Determine the Right Height for Shower Valves
Selecting the perfect height for your shower valve requires thorough consideration of several elements.
Bathroom Shower Type
The type of shower you have can affect the ideal height for your shower valves. If you have a standard bathtub/shower combination, the valve will typically be mounted 48 inches from the floor. For walk-in showers without a bathtub, the optimal height is usually around 44 inches.
Users
Carefully considering the perfect height for your shower valve when remodeling or installing a new one is of paramount importance. Depending on individual requirements, the typical shower valve heights are determined from floor level and can be anything between 42 to 48 inches. Some users may find that they need their shower valves higher or lower than the standard range, and should take this into consideration when deciding on the final height.
Your Needs and Preferences
When it comes to picking the right height for a shower valve, your personal needs and preferences should be taken into consideration. Although standard heights are usually between 35 and 48 inches from the finished floor of your bathroom, this may not be suitable for everyone. For instance, if you have a very tall family who needs a shower valve that is higher than the standard height, you can always opt for a taller one. For an indulgent and comfortable shower experience, selecting a shorter shower valve is the ideal solution.
How To Adjust Your Shower Valve Height
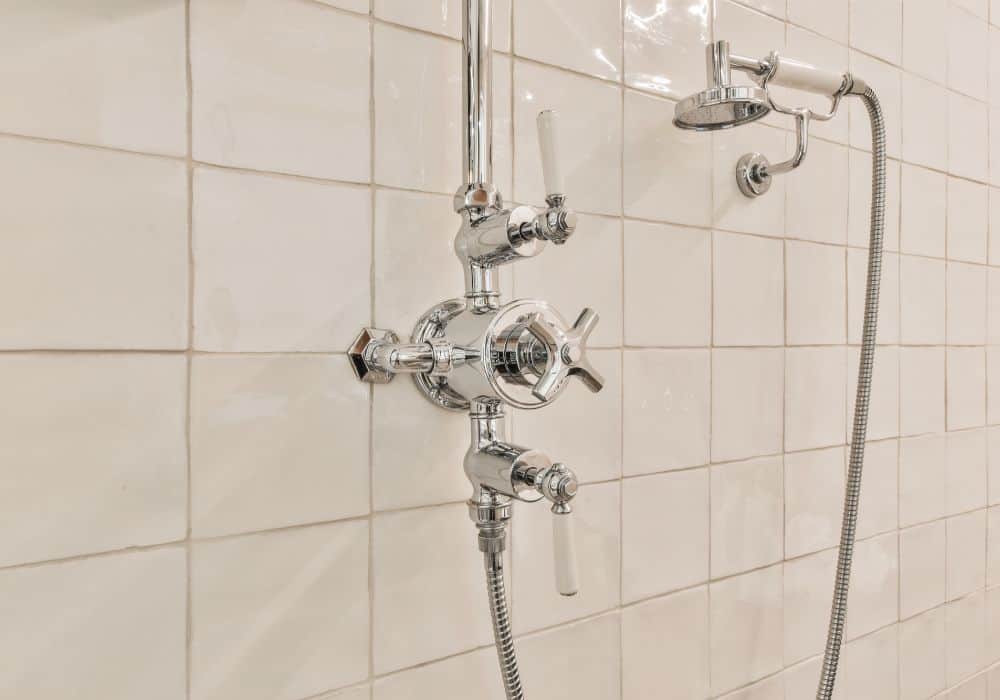
In a matter of minutes, you can conveniently and quickly adjust the height of your shower valve. Here are the steps you’ll need to follow:
Nail Height Adjustment
If you are looking to adjust the height of your standard shower valve, there is an easy solution. You can easily raise or lower the valve simply by nailing it into a different location on the wall. All you need is a power drill, screws, and some nails. First, turn off the water supply to the shower.
Next, locate the valve in the wall and mark its location. Then use a power drill to remove the screws that are holding it in place. Now you can move the valve up or down depending on how much height adjustment you need.
Finally, nail the valve back into its new location. Make sure all connections are secure and turn the water back on to test the new height. With a few simple steps, you have adjusted your shower valve height.
Screw Height Adjustment
A simple way to alter the elevation of a conventional shower valve is through adjustable mounting screws. It is essential to look over your manufacturer’s instructions before modifying any shower head or faucet settings, as this will vary depending on the type of device you have.
Generally, once you have identified the mounting screws, they can be loosened slightly with a screwdriver and then moved up or down as needed. If your shower valve is too low, you should move the screws upward until it reaches the desired height. You can also make use of plumbers tape to ensure the screws don’t slip out of their positions again. Once the adjustments have been made, be sure to tighten all screws securely.
Self-Cleaning Mechanism
Along with the standard placement of shower valves, today’s showers include a self-cleaning feature for added convenience. This mechanism ensures that the shower valve is kept in clean and sanitary condition without requiring regular manual cleaning. Self-cleaning mechanisms use an ionized spray of air and water to dislodge dirt, mold, and mildew from the shower valve. The spray of air and water then passes through a filter to trap the dirt, mold, and mildew before it is flushed away.
This prevents any buildup on the valve that can result in blockages or other problems with functionality.
Self-cleaning mechanisms are particularly helpful in homes where there may be hard water deposits that could otherwise damage the valve. Additionally, self-cleaning mechanisms can save time and energy since there is no need to manually scrub and clean the shower valve as often.
FAQ
What Is the Correct Rough-In Height for Sink Drains?
When it comes to the proper rough-in height of a sink, ideal measurements range from 10 to 14 inches above your floor’s final finish. The exact height may vary depending on the type of sink being installed. Some sinks require higher or lower rough-in heights in order to accommodate certain features, such as overhanging edges or a deeper basin. To ensure proper installation, it is important to consult the manufacturer’s specifications for the sink being installed.
What Size Pipe for the Shower Drain?
The size of piping is a critical factor to consider when it comes to plumbing. Luckily, when it comes to installing shower drains there is a universal size – 1-1/2 inch diameter plastic or copper – that you can rely on for optimal results. This applies regardless of whether you are using a standard or custom valve height. Besides selecting the right pipe size for your drain, it is also important to make sure that you install the correct fittings.
For example, if your shower is equipped with a shower pan liner, then you must use a fitting specifically designed for this purpose. It is important to remember that the size of pipe used for the drain affects water flow and pressure in the system.
Can I Recycle Fluorescent Tubes at Lowe’s?
Lowe’s does not accept fluorescent tubes for recycling in its stores. However, the company does offer a couple of options to help customers properly recycle their old fluorescent tubes. The Lowe’s Recycling Program provides customers with an easy and convenient way to dispose of fluorescent tubes, including: online mail-in recycling kits, recycling centers in select locations, and local recycling drop-off sites.
Customers can also take advantage of special offers and discounts to help offset the cost of properly disposing of their fluorescent tubes. With Lowe’s commitment to sustainability, customers can look forward to more eco-friendly solutions when it comes time to recycle their fluorescent bulbs.
Standard Doormat Size: How Big is Right for You?
When choosing a doormat that is the perfect fit for your home, there are several points to consider. The most common size for doormats is 18”x30”, but this may vary depending on the area you need to cover and the style of doormat you prefer. When choosing the perfect doormat for your entryway, size matters! Consider both the space you have available and how much coverage is desired when selecting a shape and size. When selecting doormat size, start by measuring the space for your doormat before purchasing. A larger area may require a bigger mat, while a smaller area might need a smaller one.
If you plan to place a mat outside your door, a larger size may be better to ensure that your doormat will capture more dirt and debris. Another element to take into account when deciding on the proper size of doormat is how much foot traffic you anticipate it will need to handle.
If you plan to have several people or pets regularly entering and leaving your home, then select a larger doormat size to accommodate the extra wear and tear. Doormats come in many styles, from classic to modern, so you can select one that best fits your home’s decor.
How to Connect a Hand-Held Shower to a Tub Spout?
Installing a hand-held shower to your tub spout can be conveniently done in only an hour or two, and doesn’t require much effort. The process involves purchasing the necessary parts, installing them correctly and then testing out your new setup! The first step is to purchase the correct components for the job. You’ll need a diverter valve, a hand-held shower and the appropriate connectors for your plumbing.
After you’ve procured all the pieces, measure the standard shower valve height from floor level to confirm that everything is correctly aligned. This should be done before any installation begins so that adjustments can be made if needed. After all of the parts are in place, the diverter valve can then be connected to the spout using the connectors.
The shower hose should then be attached to the exit port of the valve and tightened securely with a wrench.
Finally, the hand-held shower head can be attached to the end of the hose, screwed in place and tested for proper functionality. With just a few easy steps, you can have a functional hand-held shower connected to your tub spout in no time!
What height should a shower valve & spout be set at?
When installing a shower valve, the ideal mounting height is between 42” and 43” off of the finished floor. This can vary depending on the type of shower fixture being installed. Some taller or deeper tubs may require a higher installation height. It is important to follow the manufacturer’s instructions for specific installation heights when installing a new shower valve or spout. It is also important to consider the user when selecting a shower valve; shorter individuals may require a lower installation height than taller people. When shopping for a new shower valve, be sure to check the product specifications for the installation height range recommended by the manufacturer.
Additionally, it is important to measure twice before drilling or cutting into walls or flooring, to avoid costly mistakes.
What is the standard height for a tub valve?
The standard height for a tub valve is typically set at 48 inches from the finished floor. This height allows for comfortable access to the shower controls and provides enough room to avoid any splashing from the showerhead. It also ensures that you have plenty of clearance between your head and the showerhead when you are bathing or showering. When setting the height for a tub valve, it is important to take into account the height of the bather as well as any obstructions that may be present in the bathroom.
If possible, it is best to install the shower valve at least 6 inches higher than what is necessary for comfortable use. This will ensure that you have ample space between your head and the showerhead.
Additionally, it is important to consider the location of other fixtures in the bathroom when determining the height of the tub valve, as these may also affect your ability to comfortably use the shower.
How do I identify an American standard shower valve?
American standard shower valves are recognizable by their height. The customary shower valve height is commonly between 8” and 12”, measured from the surface of the finished floor to its core. It is also important to note that some manufacturers may have slightly different standards, so you should take this into consideration when shopping for a new shower valve.
Additionally, it is important to measure the height of your existing shower valve to ensure that you purchase a new one with the same dimensions. Measuring the height of your existing shower valve should be done with a measuring tape or yardstick. To accurately measure, place the end of your measuring tool on the finished floor and extend it up to the center of the valve. Once you have the height, be sure to make note of it so that you can purchase a new shower valve with the same measurements. Purchasing a new shower valve with the incorrect height could lead to problems with installation or improper performance. Having an accurate measurement is essential for obtaining a compatible shower valve and ensuring proper installation.
Useful Video: What Height To Install Shower Valves
Conclusion
Typically, the ideal height for a shower valve is placed between 36 to 48 inches from the floor. It should be installed at an angle of 15-30 degrees so that water flow is directed in an outward direction and away from walls or other fixtures. Plumbing codes will vary by region, so it’s important to ask your local plumber or building code official for more information. The shower valve should be installed by a qualified professional to ensure the best possible performance and safety. With proper installation, you can enjoy your new shower with great comfort and convenience.
References
- https://www.pipsisland.com/what-is-the-standard-shower-valve-height/
- https://highshower.com/shower-valve-height/
- https://alluringhouse.com/shower-valve-height/
- https://www.homedit.com/shower-valve-height/




Leave a Reply